Stress- Strain Diagram Part-1
Explain the stress- strain
diagram neatly with relevant fig.
To
select a material for using it in aircraft, we need to know what its life time is. How much it performs? and
many more requirements. All these are for having a safe flight. The life time and every required factors will be known once if we know stress strain diagram.
In
order to attain stress strain diagram, we need to have a specimen of desired
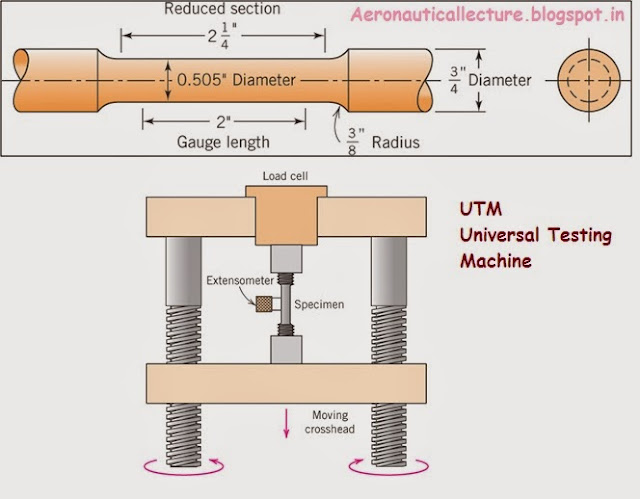
standards. A standard specimen of the mild steel material is prepared as per BIS standards is given below.
Then we need to fix it properly in the universal testing machine. We
can give tensile (widely used) or compressive load to the specimen. Load value
has to be adjusted very smoothly. By determining the stress and strain at various
magnitudes of the load, we can plot a diagram of stress versus strain.
Some common terminologies
Load - The force applied
to a material during testing.
Strain Gage or Extensometer - A
device used for measuring change in length (strain).
Engineering stress -
The applied load, or force, divided by the original cross-sectional area of the
material at that instant.
Engineering strain-
The amount that a material deforms per unit length in a tensile test.
Elastic deformation
When load acts on a material shown, it creates stress. when load is acting on a object, the object undergoes atomic bond changes, when removed it again retains its original bonding. This happens only within elastic limit. Some object is having linear elastic proportion when load applied, some follows non-linear.
Plastic deformation
From
an atomic perspective, plastic deformation corresponds to the breaking of bonds
with original atom neighbors and then reforming bonds with new neighbors. After
removal of the load, the large number of atoms that have relocated, do not
return to original position. Yield
strength is a measure of resistance to plastic deformation.
Yield strength Determination:
Typical
stress-strain behavior for a metal showing elastic and plastic deformations,
the proportional limit P and the yield strength σy, as determined using
the 0.002 strain offset method (where there is noticeable plastic deformation).
P is the gradual elastic to plastic transition.
For more detail Refer part-2


Thanks for sharing this informative post. It's very helpful. Keep it up!
ReplyDeleteSalt Spray Chamber | Box Compression Tester | Bursting Strength Tester Digital | Digital Tensile Testing Machine Cap 2500KG | Wall Thickness Gauge - MagnaMike 8600 | Testing Instruments | Laboratory Hot Air Oven
This is a great article about stress
ReplyDeleteAerospace engineering is an amazing field that focuses on designing aircraft and spacecraft. It combines science, technology, and innovation to explore the skies and space.
ReplyDeleteAeronautical engineering is truly one of the most fascinating fields! It’s amazing how it combines science, technology, and creativity to design and develop aircraft. With advancements in space exploration and modern aviation, the opportunities for aeronautical engineers are expanding rapidly
ReplyDeleteTrade Show Booth
ReplyDeleteModular Exhibit Display Designs
Custom Tradeshow Booth Design
20 x 20 Custom Trade Show Displays
Garage Builder Calgary
ReplyDeleteAffordable Garage Builder in Calgary
Low Cost Garage Builder in Calgary
Detached Garage Builder in Calgary
Medical Spa in Sherwood Park
ReplyDeleteDermal Filler in Sherwood Park
Fire Protection System Dubai
ReplyDelete